R1010717
Originally uploaded by renfield
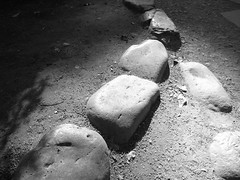
Spent the day goofing off with Tonchan in the park and taking photos. Tried some black and white with the trusty GRII. I think this one came out quite nice; good contrast, nice shadows, decent balance.
To be honest I can never remember what all the ISO, f/stop, shutterspeed, etc. settings do. Luckily I have set each one to be adjusted by a different knob on the camera, and I twiddle them all until the little indicator is right in the middle of the line that tells me it's ok to to hit the shutter button.
Dare I ask what the professional photographers in my family think?

2 comments:
You know I'm a purist, b&w just feels right.
Here's how to think about your exposures for b&w in simplest terms... your little indicator thingy, it wants to make grey. Point it at super bright wall or super dark wall and get the thingy in the middle and take a picture. You should end up with a picture of a grey wall (mid tone) exposure.
Your useful exposure range on most b&w film is about 6 stops (each shutter speed or aperture setting is one stop). From your darkest visible shadow detail in a photo, to it's brightest visible highlight detail is about 6 stops.
So armed with this info, ask your self one simple question... where do I want my grey?! Do you want the details in the shadows or in the highlights, or a little in both or more in one.
Using your rock photo as an example I would decide where to "place my grey" for the most possible detail or artistic effect. If you would've balanced the thingy while pointing it more at the shadows it would've exposed to make the shadows lighter (greyer) which would make the bright tops of the rocks dramatically brighter.
And depth of field is a whole other discussion.
Hmm that makes sense. I think I hvar setting where I can pinpoint what area if the view is used for focus and setting all the other bits. I'll point it at some shadows and see what happens.
Post a Comment